Augment an Electric Guitar with Surface Sensors
Series: alt.ctrl activities; builds on Guitar; Spatial arrangement
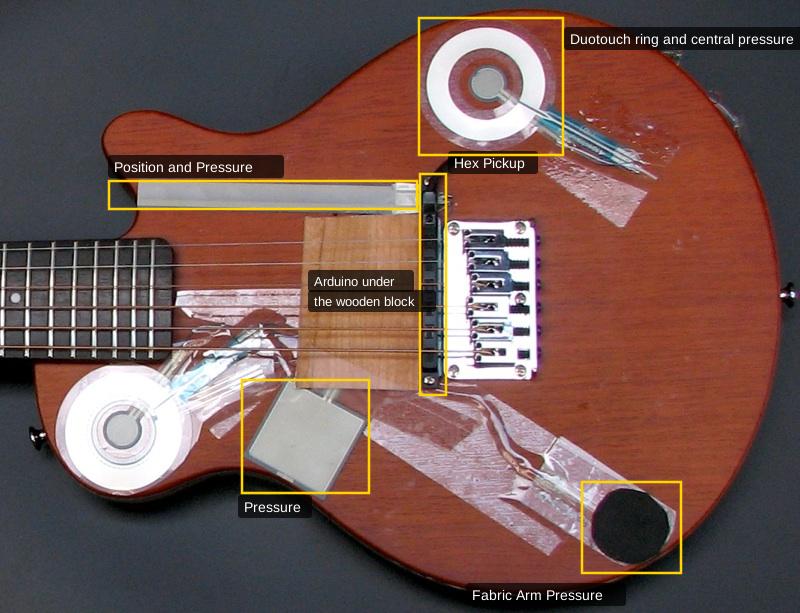
Experimental surface sensing for fingerstyle players: strip, force-sensitive and fabric sensors attached to an electric guitar, apparently haphazardly, to explore which parts of the guitar a player can work while playing the strings themselves.
The 2009 guitar was an exploratory prototype. It found that the fabric pressure sensor under the picking arm, and the slide-and-pressure strip along the top left edge, were the most reachable during playing. Its sensors were taped onto the top plate and the side for the trial: once a place proves itself, a sensor is glued down from its underside instead.
Materials
| Item | Amazon | Adafruit | SparkFun | Seeed Studio | Mouser | Digi-Key |
|---|---|---|---|---|---|---|
| An electric guitar | ||||||
| A SoftPot membrane potentiometer, for the slide position, under a long force-sensitive resistor: the 2009 guitar's strip along the top left edge is an Interlink FSR strip on top of a SoftPot | 178 | SEN-08679 | ||||
| A long force-sensitive resistor strip (Interlink FSR 408), on top, for the pressure on the strip: its interdigitated silver electrodes over black resistive polymer ink are what shows in the photograph | SEN-09674 | |||||
| Round force-sensitive resistors | 166 | SEN-09375 | ||||
| Square force-sensitive resistors | 1075 | SEN-09376 | ||||
| Piezoresistive fabric, for the fabric pressure sensor under the picking arm; contact the manufacturer, Eeonyx | ||||||
| Conductive fabric, for the fabric sensor's two electrodes | 1168 | 485-1168 | ||||
| Optional: round SoftPots, ring-shaped membrane potentiometers that read position around the ring, such as Spectra Symbol's SoftPot Rotary (an active angle of 353°, in five connector styles; the links are to the one with male pins). The 2009 guitar has two: the "Duotouch ring and central pressure", with a pressure sensor at its centre, and one at the lower left. Read them by the Duotouch method of the NIME 2009 paper, as the wiring step says | 744-SPR463531033%MP | 905-SP-R-0046-353-103-3%-MP-ND | ||||
| A microcontroller board with an analog input for each sensor (two for each SoftPot, one at each end). The 2009 guitar's Arduino sits under the wooden block; any board with enough analog inputs will do, for example the Seeed Studio XIAO SAMD21, whose eleven I/O pins are all analog inputs | 102010328 | 713-102010328 | ||||
| Pull-up resistors, one for each pressure sensor and one for each end of each SoftPot | ||||||
| Hookup wire | ||||||
| Tape, for trying out the sensors' places | ||||||
| Glue, to fix each sensor from its underside once its place is settled | ||||||
| A computer with software for sound, such as Max or Pd |
Tools
- Scissors
- Soldering iron
- An MCU IDE
Skills
- Soldering
- Making a fabric pressure sensor
- Programming an MCU: analog inputs
- Playing the guitar while noticing what the hands and arms could reach
Instructions
- Play the guitar and notice which parts of its body your hands and arms reach, or rest on, while you play the strings: the edges, the top plate around the strings and the bridge, the side.
- Make the slide-and-pressure strip: lay a long FSR strip on top of a SoftPot. The SoftPot reads where the strip is pressed, and the FSR how hard.
- Make a fabric pressure sensor for where the picking arm rests: piezoresistive fabric between two pieces of conductive fabric, each with a wire (see Kobakant's "Simple Fabric Pressure Sensors" in Related resources).
- Tape the sensors onto the top plate and the side wherever a hand or arm might work them, as in the photograph. Tape lets you move them.
- Wire each pressure sensor (a force-sensitive resistor or the fabric sensor) to its own analog input, with a pull-up resistor from the supply to the input (most microcontrollers cannot enable a built-in pull-up on an analog input; first-generation Arduinos could). Wire each SoftPot, the linear one under the FSR strip and the round ones, by the Duotouch method of the NIME 2009 paper (section 3.1 and its Figure 2): its centre, the wiper, to ground, and each of its two ends to its own analog input, with a pull-up resistor from the supply. With nothing pressing, both ends read high; a touch lowers each end's reading according to the resistance between that end and the touch nearest it, so one SoftPot senses two touches at once.
- Fix the microcontroller to the guitar and cover it: the 2009 guitar's Arduino is under the wooden block.
- Program the microcontroller to send the readings to the computer, and map them to sound.
- Play, and move the sensors around: keep the ones you can reach and work without interrupting the playing. On the 2009 guitar these were the fabric pressure sensor under the picking arm and the slide-and-pressure strip along the top left edge.
- Once a sensor's place is settled, take off its tape and glue it down from its underside.
Variations
- Build the electronics as the Universal Platform for Frankensteining Controllers, and add its Wii, USB and Qwiic inputs.
- A hexaphonic pickup at the bridge, as on the 2009 guitar (the note "Hex Pickup"), gives each string's sound separately.
- Piezoresistive fabric under other kinds of contact: see the E-Textile Pressure-Sensing Kalimba.
Related resources
- Augmented Electric Guitar (2009): the prototype
- Novel and Forgotten Current-steering Techniques for Resistive Multitouch, Duotouch, and Polytouch Position Sensing with Pressure, NIME 2009 (PDF)
- Dual Multitouch Pad with pressure
- Comparing Musical Control Structures and Signal Processing Strategies for the Augmented Cello and Guitar and Musical Applications of New, Multi-axis Guitar String Sensors
- Simple Fabric Pressure Sensors (Kobakant, How To Get What You Want; Internet Archive copy of February 2024)
- Force Sensitive Resistor (FSR) (Adafruit Learn)
Coding Prompt Build Block
A prompt to give a coding assistant, to start the code for this activity. Copy the box, answer its questions about your board and pins, and test what comes back on the bench before you rely on it.
I am building "Augment an Electric Guitar with Surface Sensors", the activity at https://adrianfreed.com/augment-electric-guitar-surface-sensors.html.
Write a program for a microcontroller that reads sensors on the body of an electric guitar, each on its own analog input: a slide-and-pressure strip (a force-sensitive resistor strip on top of a SoftPot membrane potentiometer), round SoftPots, round and square force-sensitive resistors, and a fabric pressure sensor under the picking arm. Each pressure sensor has an external pull-up resistor (most microcontrollers cannot enable a built-in pull-up on an analog input). Each SoftPot is read by the Duotouch method of Adrian Freed's NIME 2009 paper "Novel and Forgotten Current-steering Techniques for Resistive Multitouch, Duotouch, and Polytouch Position Sensing with Pressure": its centre (the wiper) is grounded, and each of its two ends has a pull-up resistor and its own analog input, so that one SoftPot senses two touches, one from each end.
When nothing presses a SoftPot, both its ends read high: report its touch positions only while it is touched, and the strip's pressure from its force-sensitive resistor. Calibrate each sensor's range, smooth the readings without adding lag, and send them to the computer as OSC messages, or as MIDI, to be mapped to sound in Max or Pd. Name the sensors in one table at the top: they will be moved and renamed while trying out places on the guitar.
Libraries to explore:
- ResponsiveAnalogRead: reduces the noise in analog readings without making them sluggish (https://github.com/dxinteractive/ResponsiveAnalogRead)
- OSC for Arduino (CNMAT): encodes and decodes OSC messages, and sends them over USB or hardware serial (framed with SLIP) or over Ethernet and Wi-Fi UDP; its Applications folder has Max/MSP and Pd examples that receive them (https://github.com/CNMAT/OSC)
- MIDIUSB: makes a board with native USB, such as the Leonardo, Micro, Due or Zero, a USB MIDI device (https://github.com/arduino-libraries/MIDIUSB)
Before writing anything, ask me what I am using: the board and its pins, or the software (such as Max, Pd or Python), and check its documentation for what this needs. Put the pin numbers, ranges and other settings in one block at the top, each with a comment. Say which of the libraries above you use, and why. Start with a test that shows the raw readings, so that I can check the wiring and the ranges before the rest.
This activity by Adrian Freed is licensed under Creative Commons Attribution-NonCommercial-ShareAlike 4.0 International (CC BY-NC-SA 4.0): you may share and adapt it with attribution, for non-commercial purposes such as personal projects and teaching, and you must share adaptations under the same licence. Product names and links belong to their suppliers.