A Phone as a Gamepad over Bluetooth MIDI: TouchOSC to an nRF52840 That Plays a USB Gamepad
Series: alt.ctrl activities; builds on Game controllers
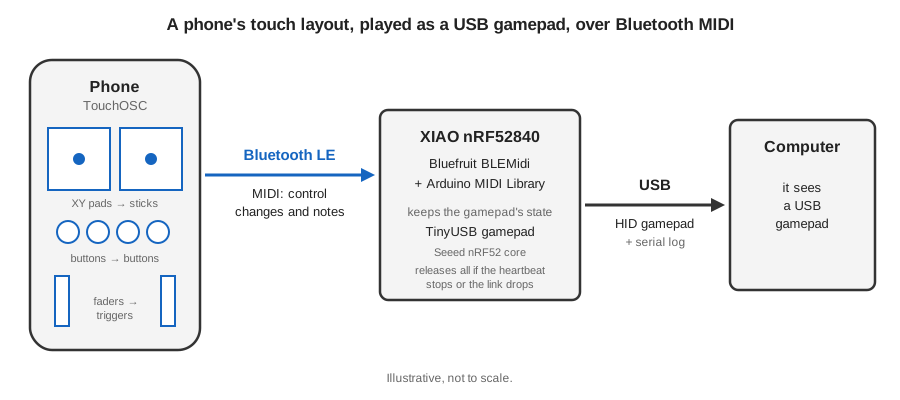
The Wi-Fi recipe carries TouchOSC's controls as OSC over a Wi-Fi network. TouchOSC's other way out is MIDI, and on a phone or tablet its MIDI can go over Bluetooth: on iOS and Android (and macOS) it has a dialog for Bluetooth MIDI controllers. A Bluetooth link needs no Wi-Fi network, router or IP address, only a board the phone can connect to. Here that board is built on Nordic's nRF52840, which has Bluetooth LE and its own USB port on one chip: Bluetooth in from the phone, a USB gamepad out to the computer.
The board is Seeed's XIAO nRF52840, the size of the XIAO ESP32S3 in the Wi-Fi recipe. Seeed's Arduino core for it is a fork of Adafruit's nRF52 core and carries two of Adafruit's libraries: Bluefruit, whose BLEMidi service makes the board a Bluetooth MIDI device, and TinyUSB, whose gamepad report has two sticks, two triggers, a hat and 32 buttons, as the ESP32's does. The owner's OSC library has run on the XIAO nRF52840 Sense with this core, answering over USB and over Bluetooth LE (OSC over the Nordic UART service, not MIDI).
The recipe itself has not been built: its two halves are examples that come with the core, Bluefruit's blemidi and TinyUSB's hid_gamepad, neither yet run here, and the bridge between them, Bluetooth MIDI in and a USB gamepad out, is not tried.
Materials
| Item | Amazon | Adafruit | Seeed Studio | Digi-Key |
|---|---|---|---|---|
| A phone or tablet running TouchOSC on iOS or Android: TouchOSC | ||||
| Seeed Studio XIAO nRF52840: 21 × 17.8 mm; USB-C; Bluetooth LE and the nRF52840's own USB port (or the Sense version, the board the owner's OSC library ran on) | 102010448 | 1597-102010448-ND | ||
| Or an Adafruit ItsyBitsy nRF52840 Express: 36.0 × 17.6 × 5.3 mm; native USB; programmed with Adafruit's own nRF52 core, from which Seeed's is forked, with the same libraries in newer versions (not tried) | 4481 | 1528-4481-ND | ||
| A USB cable from the board to the computer |
Tools
- The Arduino IDE with Seeed's nRF52 core (Seeed nRF52 Boards)
- TouchOSC's editor, on the phone or a computer
- A coding assistant, given the Coding Prompt Build Block below
- The computer's game-controller settings, or a gamepad tester in a browser
Skills
- Designing a touch layout
- Bluetooth MIDI
- USB HID devices
- Programming with a coding assistant
Instructions
- Choose a board with Bluetooth LE and a native USB port, an nRF52840 such as Seeed's XIAO nRF52840 or Adafruit's ItsyBitsy nRF52840 Express. For the XIAO, install Seeed's core, Seeed nRF52 Boards, from the board manager address in Seeed's wiki, which recommends it over the mbed-enabled core for Bluetooth. If Serial does not compile, add the line #include <Adafruit_TinyUSB.h> to the sketch, as the wiki says. On macOS the core's build calls a program named python, which a current macOS does not have: the compile succeeds and the upload then fails, until a python that runs python3 is on the PATH the IDE uses (found with the owner's OSC library).
- Run the two halves first, one at a time, from the examples installed with Seeed's core (File > Examples), not the current ones on GitHub, whose newer library versions differ. Bluefruit's blemidi example, which needs the Arduino MIDI Library, advertises a Bluetooth MIDI device, logs the note-ons and note-offs it receives (not control changes), and plays a sequence of notes back to whatever connects; it waits for the serial monitor to open before it starts. TinyUSB's hid_gamepad example makes the board a USB gamepad and steps through its hat, sticks, triggers and buttons; the computer's game-controller settings should show them.
- Connect the phone (not tried here): in TouchOSC's MIDI connections, open the dialog for Bluetooth MIDI controllers and connect to the board there, then choose the board as a connection's Send Port with Browse. hexler's manual names the dialog but does not describe it, nor say that a connected Bluetooth device then shows as a port. The phone may ask to pair the first time. If the dialog does not show the board, Adafruit's 2016 guide for its earlier Bluefruit LE boards, which the blemidi example points to, connects one with a separate app first, midimittr on iOS or MIDI BLE Connect on Android, there to play the board into other apps, the reverse of this recipe (the apps may have changed since).
- Design the layout as in the Wi-Fi recipe, with MIDI messages instead of OSC: a control change for each stick's x and y and for each trigger, and a note (or a control change) for each button and each of the four D-pad buttons, with each stick's Default at its centre and each trigger's Default at its rest, and Default Pull set on both, so that they spring back as real ones do. TouchOSC scales a control's value into a message's range before sending (out = min + in × (max − min)); give the control changes 0 to 127. That is 128 steps, which the board spreads over the gamepad's axes, -127 to 127. Add a heartbeat (not tried here): a short script at the layout's root whose update function, which TouchOSC calls every frame, uses getMillis and sendMIDI to send one control change, on a channel and controller kept for it, every half second.
- Program the board as the Coding Prompt Build Block below describes: receive the MIDI, keep the gamepad's state, and send the latest state to the computer whenever it changes and the computer is ready for it. Release everything when the heartbeat stops, as well as when the Bluetooth link drops. The phone's Bluetooth MIDI link need not be TouchOSC's alone (in Adafruit's guide one app connects the board and another plays through it), so it may stay up while TouchOSC is silent, and TouchOSC sends a control only when it changes: without the heartbeat, a held button could stay held. A drop of the radio link itself reaches the board only after a supervision timeout, which the phone chooses. When the phone reconnects, a control still held stays released until it moves. The board's Bluetooth MIDI pairs with no PIN, so while it advertises (until the phone connects, and again whenever the link drops) anyone in range can connect and play the gamepad, or take its one connection first: have it accept only the phone you paired, and unplug it when you are not playing. It is a gamepad, so it cannot type into the computer.
- Test it: the computer's game-controller settings, or a gamepad tester in a browser, should show the sticks and buttons move as you touch the phone; then try the game itself. Then measure, on the board, the delay from each MIDI message's arrival to the report it causes, and its spread; the time before arrival (the phone, TouchOSC and Bluetooth) and from report to game needs a clock outside the board and is not covered here.
- Play: map the layout to a game, or make one layout per game.
Variations
- Over Wi-Fi instead: the Wi-Fi recipe, with OSC and an ESP32-S3.
- A Bluetooth gamepad as well: Bluefruit's blehid_gamepad example presents a gamepad over Bluetooth instead of USB, so the board could run from a battery with no cable; it would then hold two Bluetooth connections, the phone's and the computer's, so Bluefruit must be started with two peripheral connections and keep advertising after the first (not tried).
- Feedback to the phone: the board sends MIDI back over the same link, so TouchOSC shows whether the computer has the gamepad (not tried).
- Two players: two phones and two boards, one gamepad each.
Related resources
- Seeed's XIAO nRF52840 wiki: the two Arduino cores and when to use each
- Adafruit's nRF52 Arduino core: the Bluefruit library and its blemidi and blehid_gamepad examples
- Adafruit TinyUSB for Arduino: the USB gamepad and its hid_gamepad example
- TouchOSC and its manual's MIDI connections page
- A Phone as a Gamepad: TouchOSC over Wi-Fi: the same controls as OSC, to an ESP32-S3
Coding Prompt Build Block
A prompt to give a coding assistant, to start the code for this activity. Copy the box, answer its questions about your board and pins, and test what comes back on the bench before you rely on it.
I am building "A Phone as a Gamepad over Bluetooth MIDI: TouchOSC to an nRF52840 That Plays a USB Gamepad", the activity at https://adrianfreed.com/touchosc-bluetooth-midi-gamepad.html.
Help me make a Seeed XIAO nRF52840 into a bridge: it receives MIDI over Bluetooth LE from TouchOSC on a phone and presents the controls to a computer as a USB gamepad. Use Seeed's nRF52 Arduino core (Seeed nRF52 Boards, not the mbed-enabled one) and work from the examples installed with it, not the current GitHub versions, whose API differs: Bluefruit52Lib 0.21.0 (Peripheral > blemidi) for the BLEMidi service, with the Arduino MIDI Library (5.0.2), and Adafruit TinyUSB 1.7.0 (HID > hid_gamepad) for the gamepad (TUD_HID_REPORT_DESC_GAMEPAD and hid_gamepad_report_t). In setup(), call usb_hid.begin() first, before Serial and before any Bluefruit or MIDI setup, so that the computer finds the gamepad beside the serial port; if the board is already mounted by then, detach and attach it. Call MIDI.turnThruOff() after MIDI.begin(): through BLEMidi the library otherwise echoes every message back to the phone. Keep the USB serial port for a log, but never wait for it to open, and never let logging hold up MIDI or reports: keep log entries in memory and print them when Serial has room.
Bluetooth: advertise the BLE MIDI service under a name I can change, as Bluefruit's blemidi example does, and accept one connection. Once my phone has paired, refuse pairing by any other device: Bluefruit loads a bond's keys only when the phone asks to encrypt, so a device cannot be judged when it connects; use the pairing-complete callback (if a bond already exists, remove the new one and disconnect), and ask me before relying on a phone's address, which may change. Give me a serial command that forgets the pairing (Bluefruit keeps it in flash; Bluefruit.Periph.clearBonds). Read MIDI in loop(), draining the BLE MIDI buffer each time, rather than in a separate task: the buffer holds 128 bytes and drops what does not fit. Have the disconnect callback only set a flag that loop() acts on; Bluefruit restarts advertising by itself (restartOnDisconnect). Log the supervision timeout the phone grants (getSupervisionTimeout, in units of 10 ms).
Mapping: accept control changes for the left and right sticks (x and y) and the two triggers, and notes or control changes for the buttons and the D-pad; ask me the channel, controller and note numbers rather than assuming them, and keep the whole map in one table I can edit. Scale the sticks' 0 to 127 to -127 to 127, the descriptor's range, mapping 63 and 64 both to 0 (TouchOSC's centre is 63.5 before it becomes an integer); ask me where a released trigger should rest, and which way TouchOSC's y runs (the hid_gamepad example's two sticks disagree on which way is up). Combine the four D-pad buttons into the hat: 0 centred, 1 up, then clockwise to 8 up-left; two neighbours give a diagonal, opposite buttons cancel. Keep the gamepad's state in one place and do not send from the MIDI callbacks: TinyUSB's sendReport sends nothing while the previous report still waits for the computer, so in loop(), whenever usb_hid.ready() and the state differs from the last report that sendReport accepted, send the current state.
Log, with timestamps, each MIDI message's arrival and each gamepad report sent, so I can measure the delay on the board and its spread.
Safety: TouchOSC sends a control only when it changes, and the phone may keep the link up while TouchOSC is silent, so do not rely on the disconnect alone: the layout sends a heartbeat control change every half second (ask me its channel and controller). Release every button, centre the sticks and the hat, and return each trigger to its rest when the heartbeat stops for a time I set, a few heartbeat periods long, and when the link drops. Never time out on the controls themselves.
Libraries to explore:
- Adafruit Bluefruit nRF52 library (Bluefruit52Lib): the Bluetooth LE library of Adafruit's nRF52 Arduino core and of Seeed's fork of it: BLEMidi makes the board a Bluetooth MIDI device, read through the Arduino MIDI Library in its blemidi example, and its blehid examples make a Bluetooth keyboard, mouse or gamepad (https://github.com/adafruit/Adafruit_nRF52_Arduino/tree/master/libraries/Bluefruit52Lib)
- Arduino MIDI Library: sends and receives MIDI over any serial port, and over USB, Bluetooth or a network through its transports (https://github.com/FortySevenEffects/arduino_midi_library)
- Adafruit TinyUSB for Arduino: makes the board a USB device with several interfaces at once, among them Serial (CDC), MIDI and HID; TinyUSB's gamepad report has six 8-bit axes, a hat and 32 buttons, and its mouse report moves the pointer; setPollInterval sets, in milliseconds, how often the computer asks for HID reports; see the hid_composite, hid_gamepad and midi_test examples (https://github.com/adafruit/Adafruit_TinyUSB_Arduino)
Before writing anything, ask me what I am using: the board and its pins, or the software (such as Max, Pd or Python), and check its documentation for what this needs. Put the pin numbers, ranges and other settings in one block at the top, each with a comment. Say which of the libraries above you use, and why. Start with a test that shows the raw readings, so that I can check the wiring and the ranges before the rest.
This activity by Adrian Freed is licensed under Creative Commons Attribution-NonCommercial-ShareAlike 4.0 International (CC BY-NC-SA 4.0): you may share and adapt it with attribution, for non-commercial purposes such as personal projects and teaching, and you must share adaptations under the same licence. Product names and links belong to their suppliers.