Ondestrak
Series: alt.ctrl activities; builds on Gametrak and Ondes Martenot; Spatial arrangement
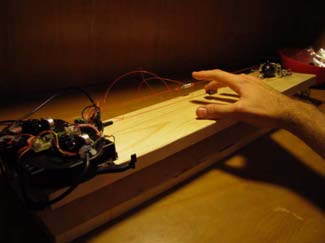
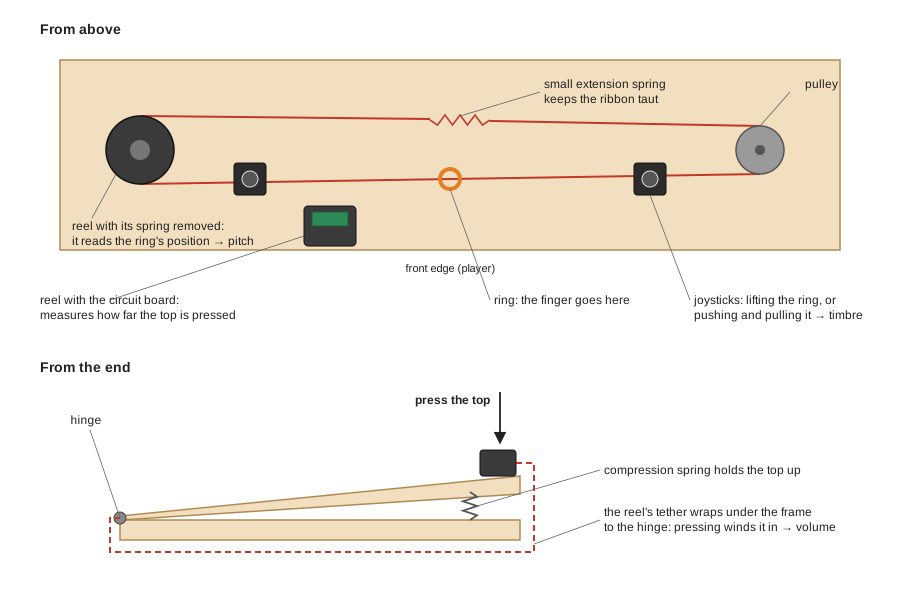
The Ondestrak, built by Devin McCutchen at CNMAT, explores a variant of the Ondes Martenot's pitch ring. A finger drags a ring on a loop of cord that turns one Gametrak sensor, its spring removed. The other sensor measures how far the board the instrument is built on is pressed down. The joysticks the cord passes through give a third axis as the ring moves away from and toward the player, mapped to timbre.
Full step-by-step instructions, with photographs, are in Devin McCutchen's Instructable The Ondestrak. Below is an outline.
Materials
| Item | Amazon | eBay |
|---|---|---|
| A Gametrak controller (originally sold with two gloves and a footswitch) | search | |
| A wooden board, cut in half for the base and the hinged top (the Instructable suggests one 4 to 5 feet long and about ¾ inch thick) | ||
| A pair of door hinges | ||
| Four small L brackets | ||
| Five small binder clips | ||
| One or two compression springs, to hold the hinged top up | ||
| One small extension spring, to keep the ribbon taut | ||
| Wood screws and washers | ||
| Strong double-sided tape or adhesive, for wood and plastic | ||
| A computer with Max/MSP or Pd |
Tools
- Screwdriver
- A fine hacksaw
- Soldering iron
- Protective gloves and eye protection, for removing the spring
- Sandpaper (optional)
Skills
- Soldering
- Sound programming in Max/MSP or Pd
Instructions
- Set the Gametrak up as in Set Up a Gametrak for Music.
- Take out the parts you need: both reels (one carries the circuit board), both joysticks, and one of the two pulleys. Keep hold of the tethers: they are under spring tension.
- Safety first. Remove the spring from the reel without the circuit board. The spring is tightly wound, greasy and sharp; it can shoot out, and keep uncoiling afterwards. Wear protective gloves and eye protection, work in an open space, keep the reel's halves squeezed together as you unscrew them, and open it away from yourself.
- Turn that reel into a pulley that still turns its sensor: keep its cord for the ribbon, cut off its cord guide, and open a slot in its side for the ribbon. Leave the grease in: the Instructable found that cleaning it out made the action sticky.
- Hinge the two halves of the board together along one long side, with a compression spring between them, so that the top springs back up when pressed.
- Mount the reel with the circuit board at the front edge, and wrap its tether under the frame to the hinge, so that pressing the top winds it in: this reading sets the volume.
- Mount the spring-less reel at one end and the pulley at the other, and mount the two joysticks on L brackets so that the front run of the ribbon passes through them.
- Make the ribbon from the spring-less reel's cord: fix a ring in it for the finger (the Instructable uses a binder clip with its arms removed), thread it through the joysticks, loop it around the reel and the pulley, and tie its ends to the extension spring so that it stays taut.
- Map the readings: the pressed board to volume (silent when released), the ring's position to pitch, and the joysticks (the ring lifted, or pushed and pulled) to timbre.
Variations
- Map the ring's position to pitch in equal musical steps, as on a keyboard, rather than directly to frequency in hertz.
- Mark pitches along the ribbon's path, as the Instructable does with a labelled strip of paper.
Related resources
- The Ondestrak, Devin McCutchen's Instructable (2009)
- Musical Applications and Design Techniques for the Gametrak Tethered Spatial Position Controller, Freed and others, SMC 2009, section 4.8
- Ondes Martenot (Wikipedia)
Coding Prompt Build Block
A prompt to give a coding assistant, to start the code for this activity. Copy the box, answer its questions about your board and pins, and test what comes back on the bench before you rely on it.
I am building "Ondestrak", the activity at https://adrianfreed.com/ondestrak.html.
Write a Max or Pd patch, or a program, for a Gametrak rebuilt as a ribbon controller: one sensor's extension measures how far the hinged board is pressed down; the other sensor, its spring removed, is turned by a loop of cord and measures the finger ring's position along it; the joysticks that the cord passes through measure the ring lifted, or pushed and pulled.
Map the pressed board to volume, silent when released; the ring's position to pitch, in equal musical steps as on a keyboard rather than directly to frequency in hertz, with a table that marks the pitches along the ribbon; and the joysticks to timbre.
Libraries to explore:
- o.io.gametrak (CNMAT MMJ Depot): CNMAT's Max patch for the Gametrak: it opens the device and outputs /left/x, /left/y, /left/z, /right/x, /right/y, /right/z and /footswitch, the angles scaled from -1 to 1 and the extensions from 0 to 1 (https://github.com/CNMAT/CNMAT-MMJ-Depot/tree/master/patchers/io/gametrak)
- odot (CNMAT): the o. objects for Max and Pd that o.io.gametrak is built from, with OSC bundles as their data type (https://github.com/CNMAT/CNMAT-odot)
- Max hi object: reads human interface devices, such as game controllers, in Max (https://docs.cycling74.com/reference/hi/)
- Pd hid external: reads USB HID devices, such as joysticks and gamepads, in Pd, on GNU/Linux and macOS (https://github.com/pd-externals/hid)
Before writing anything, ask me what I am using: the board and its pins, or the software (such as Max, Pd or Python), and check its documentation for what this needs. Put the pin numbers, ranges and other settings in one block at the top, each with a comment. Say which of the libraries above you use, and why. Start with a test that shows the raw readings, so that I can check the wiring and the ranges before the rest.
This activity by Adrian Freed is licensed under Creative Commons Attribution-NonCommercial-ShareAlike 4.0 International (CC BY-NC-SA 4.0): you may share and adapt it with attribution, for non-commercial purposes such as personal projects and teaching, and you must share adaptations under the same licence. Product names and links belong to their suppliers.